 |
Restrict or Enable Messaging Access
Follow this procedure to restrict or enable the messaging access for a student or a group of students.
1. On the admin menu bar, click Admin Utilities. The Admin Utilities page appears.
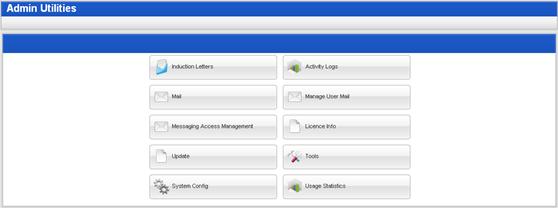
2. Click the Messaging Access Management button. The Messaging Access Management page appears.

3. In the Surname field, enter the surname – or part of the surname – of the user whose messaging access you want to restrict.
|
|
Use the Advanced Search tab to target your search. |

4. Click the Search button. The Search results appear.
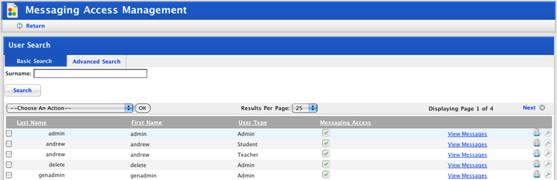
5. Restrict or enable an individual user’s message access:
a. To restrict a user’s
messaging access, adjacent to the user’s name, ensure that the Message Access checkbox is not
selected  . The user’s messaging access is
restricted and the ‘Message Access Status Updated’ notification appears.
. The user’s messaging access is
restricted and the ‘Message Access Status Updated’ notification appears.
b. To re-enable a
user’s messaging access, adjacent to the user’s name, ensure that the Message Access checkbox is
selected  . The user’s messaging access is
re-enabled and the ‘Message Access Status Updated’ notification appears.
. The user’s messaging access is
re-enabled and the ‘Message Access Status Updated’ notification appears.
6. Restrict or enable a group of users’ message access:
a. Select the users whose message access you want to update.
b. From the Choose an Action drop-down list, select either:
• Enable message access for selected users, or
• Disable message access for selected users.
c. Click the OK button. The selected users’ message access is updated.